

Can I Install a GPS Tracker Myself?
Yes, and it's easier than you think. Most drivers and small fleet owners can install a GPS tracker in under 15 minutes with zero professional help. Whether you're keeping tabs on a teenager's first car or tracking a company van across the city, the right tracker makes the whole process surprisingly simple.
Here's what to expect before you start:
- Plug-in (OBD-II) trackers: No tools needed. Ready in under 5 minutes.
- Magnetic battery-powered trackers: Just stick it on any metal surface. No wiring at all.
- Hardwired trackers: Takes 30-60 minutes but gives you a permanent, hidden, tamper-proof setup.
Not sure which type suits your vehicle and skill level? We'll walk you through all three, step by step.
What Types of GPS Trackers Are Easiest to Install Yourself?
Installation difficulty depends almost entirely on the tracker type, not the brand or vehicle model. Understanding the differences helps you choose the right installation method for your skill level and needs.
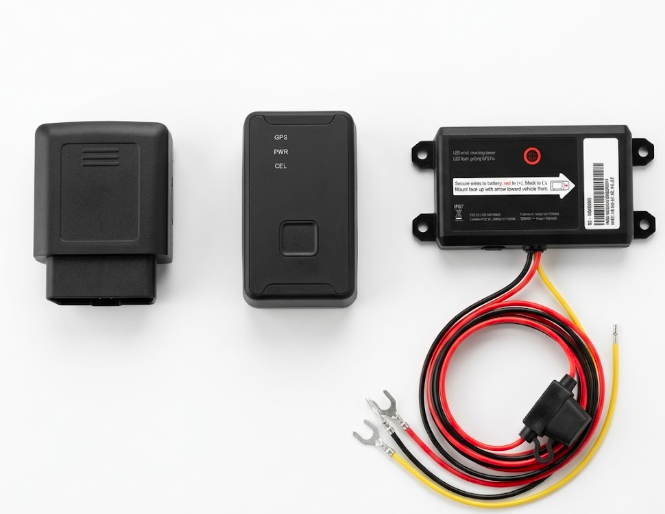
The three main categories are OBD-II plug-in trackers, magnetic battery-powered units, and hardwired devices that connect directly to the vehicle’s electrical system.
OBD-II Plug-In Trackers (Fastest DIY Option)
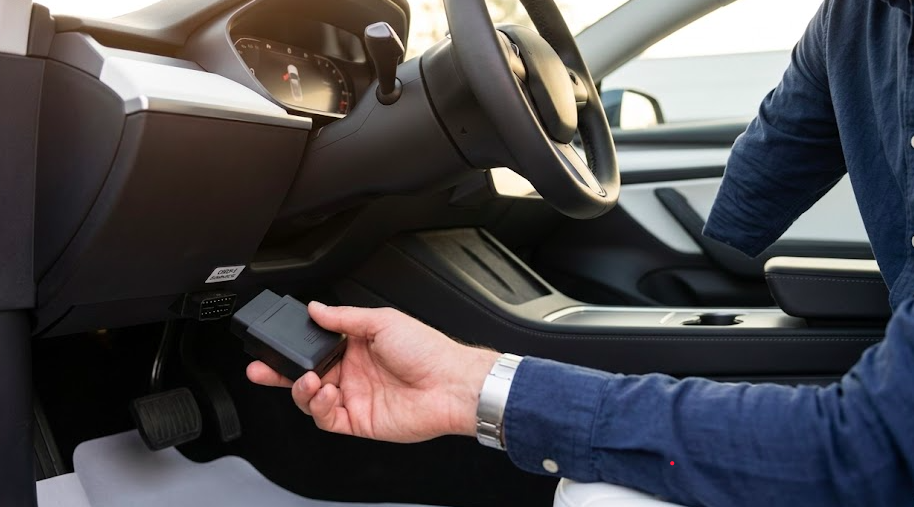
The vehicle’s OBD-II port is a 16-pin diagnostic connector required on all U.S. gasoline vehicles since 1996. Diesel vehicles adopted the standard in the late 1990s with phased implementation. In Europe, petrol vehicles followed in 2001, with diesel models joining in 2004 through emissions regulations. As a result, almost every modern car and light truck supports OBD-II connectivity. Installing a plug-and-play GPS tracker through this port is straightforward. You locate the OBD-II port under the dashboard, plug in the device, and activate it through the mobile app.
Most drivers finish the setup in under five minutes without using any tools. In real-world installs, the port usually sits within 18-24 inches of the steering wheel, often just to the left of the column or near the lower dash panel.
There is one trade-off. OBD trackers remain visible and can be unplugged easily. Some users solve this by adding a Y-cable, which lets you tuck the tracker deeper behind the dashboard while keeping the port accessible for diagnostics.
Magnetic / Battery-Powered Trackers (No Wiring Required)
These wireless trackers contain internal batteries and powerful built-in magnets that hold firmly even at highway speeds. Installation involves nothing more than choosing and cleaning a flat surface on the vehicle.
Common use cases include trailers, classic cars without OBD ports, leased vehicles where modifications void agreements, and temporary tracking scenarios. You can mount them under the chassis, inside the rear bumper, or on a frame rail.
The trade-offs are straightforward: you’ll need to recharge every 2-12 weeks depending on reporting frequency, and built for outdoor use, weatherproof in rain, dust, and extreme temperatures
Perfect if you want a hidden, no-fuss tracker you can move between vehicles in seconds.
Hardwired Trackers (Most Secure Option)
A hardwired tracker ties into the vehicle’s 12V or 24V system via power and ground wires plus an optional ignition wire. This delivers permanent power from the vehicle battery, making the device nearly impossible for thieves to disable.
Key advantages include support for advanced security features like ignition status detection and remote engine immobilization on compatible models.
DIY installers should be comfortable identifying fuses, using basic tools like wire strippers and a multimeter, and removing interior panels on 2010-2026 vehicles. Typical installation time runs 30-60 minutes per vehicle once you understand the process.
For high-value fleet vehicles or construction equipment, a hidden hardwired GPS install is often worth the extra effort.
What Tools and Skills Do You Need to Install a GPS Tracker Yourself?
Most DIY installs don’t need much equipment. OBD and magnetic trackers don’t need any tools at all, you just use the device and your phone. Hardwired trackers need a few basic tools, but most people already have them.
The key skill is following the wiring diagram step by step. If you’ve ever installed a dash cam or replaced a car stereo, you’ll be able to handle a hardwired GPS tracker.
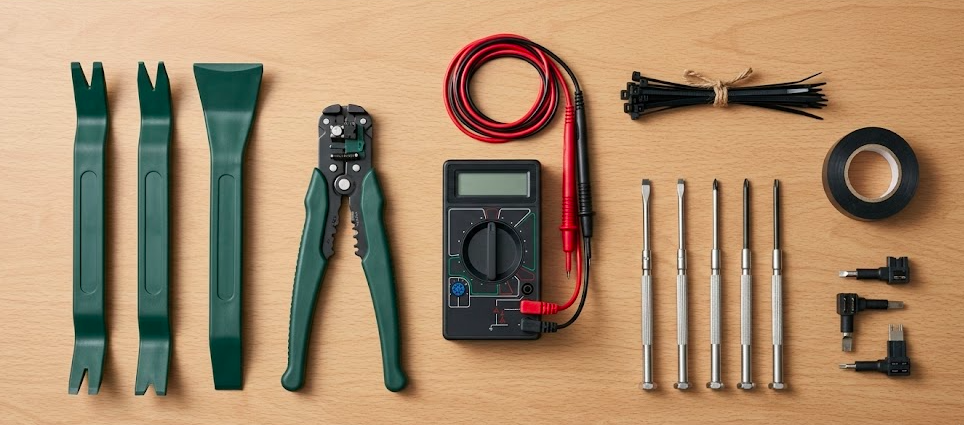
Typical Tools for a DIY Hardwired Install
Gather these before starting:
- Trim removal tools or plastic pry bar (to remove panels without cracking them)
- Small Phillips and flathead screwdrivers
- Wire strippers and crimpers
- Electrical tape and zip ties for secure installation
- Multimeter (to identify the constant power wire versus ignition wire)
- Add-a-fuse taps (cleaner than cutting factory wires)
- Double sided tape or adhesive pads for mounting
Using fuse taps instead of splicing into the fuse box keeps your installation reversible and reduces risk of short circuits.
Basic Skills That Make DIY Installation Easier
You don’t need advanced skills, but a few basics help:
- Follow a simple wiring diagram step by step
- Identify the correct fuse or power source
- Remove and reinstall dash panels without breaking clips
Take your time while installing. Label wires, take a quick photo before removing anything, and test connections before putting panels back. If you’re unsure about using a multimeter or working with wires, it’s better to go with an OBD or magnetic tracker instead.
How to Install an OBD-II GPS Tracker Yourself
This GPS tracker installation guide covers the fastest method for most car owners. No wiring required, and the steps work across brands as long as your vehicle has an OBD II port.
Finding and Accessing the OBD-II Port
The port sits under the dashboard on the driver’s side, usually within two feet of the steering wheel. Look near the steering column, behind a small flip cover, or near the hood release lever. Check your owner’s manual or search online for your specific model if the port is hard to locate. Most ports are exposed and require no panel removal.
Plugging In and Activating the Device
- Turn off the ignition and plug the tracker in firmly (the OBD port stays live even with the ignition off, that's normal)
- Turn ignition to ON or start the engine
- Watch the LED lights, solid green typically indicates power, flashing blue shows network connection
- Log into your tracking app, enter the device IMEI, and complete activation
- Wait 2-3 minutes outside for the GPS signal to connect
- Take a 5-10 minute test drive to verify GPS data updates correctly
Before you finish, make sure you can see live location and trip history in the app.
How to Install a Magnetic / Battery-Powered GPS Tracker
This installation method avoids all vehicle modification and works on cars, vans, trailers, and machinery no modifications needed, works on any vehicle, any age.
Choosing a Safe and Discreet Location
Strong mounting spots include:
- A metal frame rail running along the middle of the vehicle
- Inside the rear bumper where there's a flat metal surface
- Along a cross-member that's well away from the exhaust
- Under a seat on a metal support bar
Avoid mounting at the very bottom of the vehicle where road debris can hit it. Keep the tracker away from the exhaust pipe too, that area gets extremely hot and can damage or melt the device.
Preparing the Surface and Securing the Tracker
Clean the mounting area with alcohol wipes to remove oil and road grime. A clean surface dramatically improves magnetic grip and prevents shifting during driving. After attaching, perform a firm tug test to confirm the magnet holds. Take a short test drive, then physically verify the device hasn’t moved before checking trip data in your app.
How to Install a Hardwired GPS Tracker Yourself
This section is for users willing to work under the dash for a cleaner, more secure installation. Always follow your specific device’s wiring diagram, colors and wire functions vary between manufacturers.
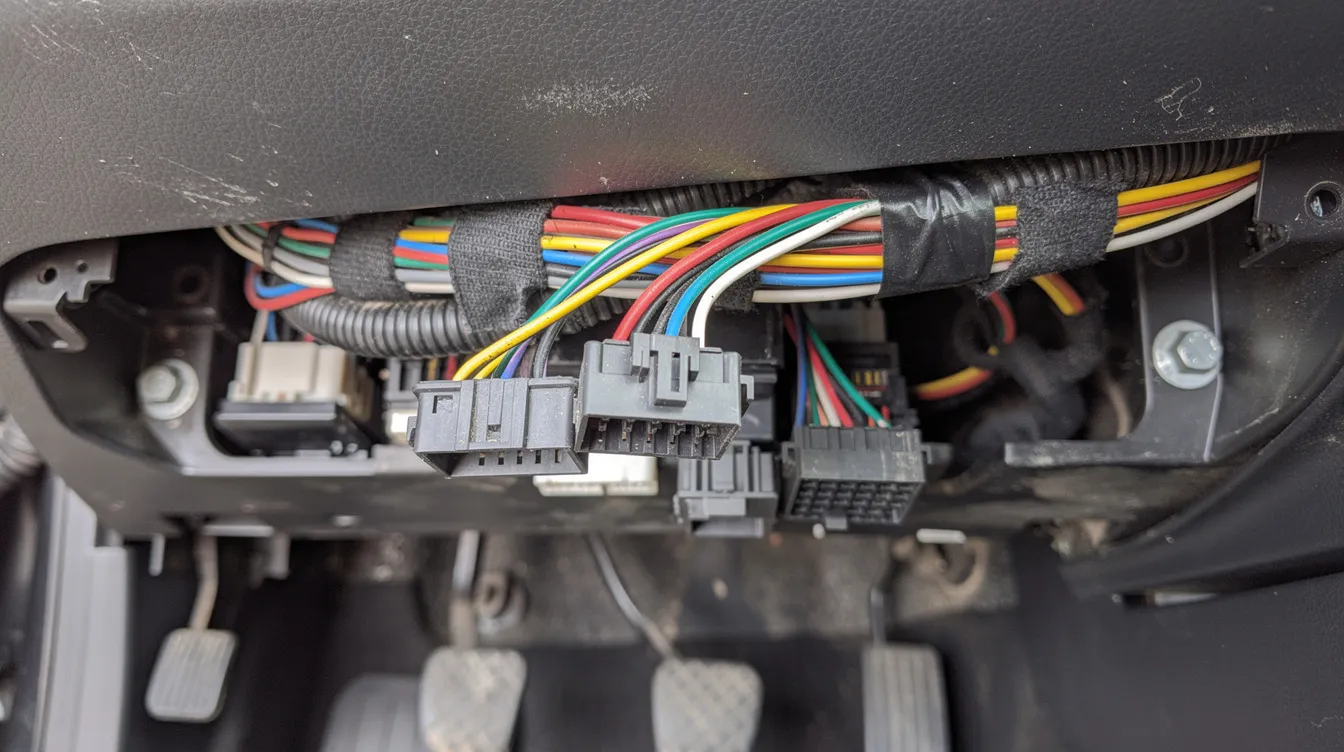
Preparing the Vehicle and Locating Power Sources
Turn off the ignition and disconnect the car’s battery at the negative terminal before touching any wires. Remove lower dash or kick panels using plastic trim tools to access the fuse box near the steering column. Use a multimeter to identify a constant 12V power source and an ignition-switched source. Many installers use fuse taps rather than cutting factory wires.
Connecting Power, Ignition, and Ground Wires
Typical wire functions:
|
Wire |
Connection Point |
|---|---|
|
Tracker’s red wire |
Constant power (via fused connection) |
|
White/Yellow |
Ignition wire (switched power) |
|
Black |
Ground wires to unpainted chassis metal |
Use crimp connectors or solder with heat shrink instead of just twisting wires together. If your tracker doesn’t come with a fuse, add a small 3-5 amp fuse to the power wire for safety. Good ground points include existing factory ground bolts on bare metal, scraped clean of paint.
Mounting the Tracker and Securing the Wiring
Mount the device high under the dashboard with the GPS antenna facing upward toward the windshield. Avoid placing it behind thick metal structures that block the GPS signal.
Secure everything with double sided tape or zip ties, routing cables along existing looms. Protect wires passing through holes with sleeving, and keep everything clear of pedals and steering components.
Reconnecting Power and Testing the Installation
Reconnect the battery, turn ignition ON, and check LED lights for power and network lock. Wait outdoors for several minutes for the first GPS fix.
Verify in your tracking platform that correct installation shows ignition status changes and live positioning. Take a 10-15 minute test drive checking route history, speed data, and stop/start events.
After successful testing, refit all panels carefully. Check nothing rattles and no wires are pinched.
Is It Legal to Install a GPS Tracker Yourself And Will It Void Your Warranty?
Before you install, two questions come up almost every time, is this legal, and will it affect my warranty? The short answer to both is yes and no, and here is exactly what you need to know.
Is It Legal to Install a GPS Tracker Yourself?
Yes, tracking a vehicle you own is completely legal in all 50 US states. This includes your personal car, your company vehicles, and your minor child's car.
The one rule to know is this: tracking someone else's vehicle without their knowledge or consent is illegal in most states, regardless of your relationship to that person. If you are ever unsure about your specific situation, check your state's local laws before installing.
Will It Void My Car Warranty?
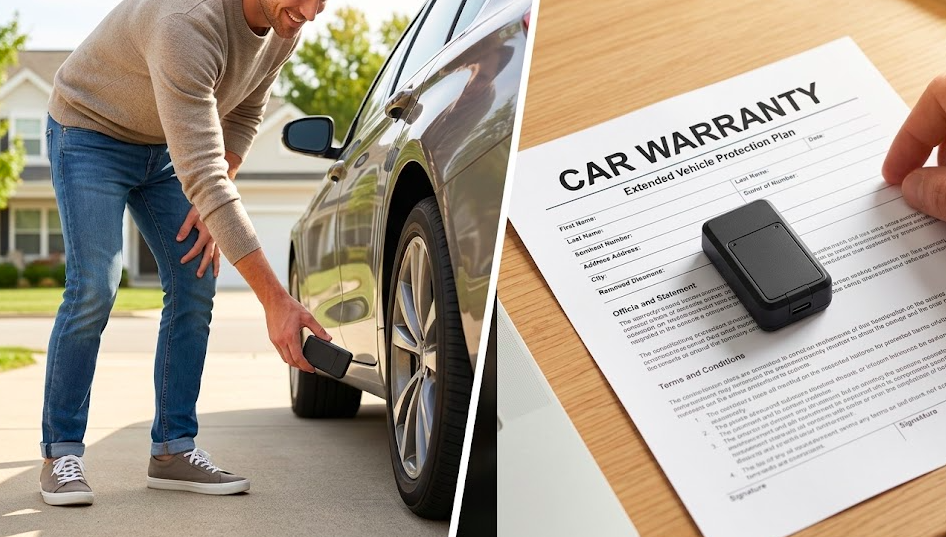
In most cases no, it won't. Under the Magnuson-Moss Warranty Act, a dealer must prove that your GPS tracker directly caused a specific problem before they can deny your warranty claim. Simply having a tracker installed is not a valid reason to void your coverage.
OBD-II plug-in and magnetic trackers carry zero warranty risk since they don't touch or modify any of your vehicle's wiring. Hardwired trackers are only a concern if installed incorrectly, loose wires, missing fuses, or poor connections. A clean install following the manufacturer's instructions carries no risk at all. If you drive a leased vehicle or newer electric vehicle, it is worth checking your specific warranty terms first. When in doubt, a magnetic or OBD-II tracker is always the safest choice.
How to Decide: DIY GPS Tracker Install vs Professional Installer
Not sure whether to install it yourself or hire someone? Here's a simple way to decide.
Think about three things, how comfortable you are with basic tools, what type of vehicle you're tracking, and how permanent you need the setup to be. Professional installation typically costs $50-$150 per vehicle, so DIY can save you real money, especially across a small fleet.
When DIY Installation Makes the Most Sense
- Tracking a family car using a plug-and-play OBD tracker
- Temporarily monitoring a vehicle with a magnetic tracker
- Installing on older vehicles with simple, straightforward wiring
- Managing a small fleet-a fleet owner can save $500-$1,000 by doing it themselves
DIY also gives you the flexibility to move trackers between vehicles whenever your needs change.
When It's Worth Paying for Professional Installation
Go with a professional if you're working with a late-model luxury vehicle, an electric vehicle with high-voltage systems, or a vehicle that already has an aftermarket alarm installed. High-value machinery where downtime isn't an option is also worth the extra cost.
Professionals know exactly where to hide devices and how to route wiring cleanly for long-term durability. Some businesses also need a written installation invoice for insurance or compliance purposes.
Testing and Maintaining Your DIY GPS Tracker Setup
Installing the tracker is only half the job. Before you're done, take a few minutes to confirm everything is working correctly. Run the device through at least one or two test drives over a couple of days. Check that location updates are accurate, alerts are firing correctly, and the data refresh rate matches your settings.
Set a calendar reminder every 3 months to quickly review device health, it takes less than 5 minutes and keeps your tracker running reliably.
Verifying Signal Quality and Data Accuracy
- Open the app and compare the live position to a known location like your driveway
- Trigger at least one geofence alert and one speed alert to confirm notifications work
- Make sure location updates are coming through at your expected intervals
If you see frequent "no signal" errors or the position is jumping around unexpectedly, contact Lightning GPS support, they'll help you sort it out quickly.
Ongoing Care: Batteries, Firmware, and Repositioning
- Magnetic trackers: Recharge every 2-12 weeks depending on your reporting frequency
- Hardwired trackers: Do a quick wiring check every few months
- All trackers: Check for firmware updates in your app regularly
If your vehicle's routine changes, different routes, more off-road driving, or coastal conditions, consider repositioning the tracker to maintain the best signal and concealment.
Final Thoughts
Installing a GPS tracker yourself is easier than most people expect. For many vehicles, it takes just a few minutes and no tools at all. Even hardwired setups, while more involved, are manageable with a bit of patience and the right approach.
The key is choosing the right type of tracker for your situation. If you want something quick and simple, an OBD-II or magnetic tracker will get the job done with almost no effort. If you need a more secure and permanent solution, a hardwired install is worth the extra time.
Take your time during setup, test everything properly, and don’t hesitate to go with a simpler option. If you’re unsure, start simple and see which GPS tracker fits your vehicle. With the right choice, you can have a reliable tracking system up and running the same day, without paying for professional installation.
FAQ
Can I install a GPS tracker on my car myself?
Yes, most GPS trackers are designed for easy DIY installation. OBD-II plug-in trackers take under 5 minutes with no tools at all. Magnetic trackers are even simpler, just stick them on any flat metal surface. Hardwired trackers take 30-60 minutes and need basic tools but are well within reach for anyone comfortable with simple car work.
Will a GPS tracker drain my car battery?
In most cases, no. OBD-II plug-in and hardwired trackers draw a very small amount of power from your vehicle, typically not enough to cause any noticeable battery drain.
Most vehicles can sit unused for 30 or more days before a properly installed tracker causes any issue. Magnetic battery-powered trackers run on their own internal battery and don't touch your vehicle's power at all.
Can I install a GPS tracker on a leased car?
Yes, use a magnetic battery-powered tracker. It attaches with magnets, leaves zero marks, and requires no modifications to the vehicle whatsoever. It's the safest and most lease-friendly option. Avoid hardwired or OBD-II trackers on leased vehicles unless your lease agreement specifically allows modifications.
How do I know if my GPS tracker is working after installation?
Open the app and check the live position, it should match your current location within a few meters. Then take a short 5-10 minute test drive and confirm that the route and speed data appear correctly in the app.
If you have geofence or speed alerts set up, test those too. If you see a "no signal" error, move the vehicle outdoors and give it 2-3 minutes to get a GPS fix.
Can someone find and remove my GPS tracker?
A poorly hidden tracker can be found. A well-installed one is much harder to detect. OBD-II trackers are the most visible since they sit in an exposed port, use a Y-cable to push it deeper behind the dash. Magnetic trackers hidden inside a rear bumper or along a frame rail are very difficult to find without a professional sweep.
Hardwired trackers mounted high under the dashboard are the hardest to detect and remove.
Posted by Kellie Kendall on Feb 20th 2026